
Station: USB-CW-VOX adapter
The RemoteTx USB-CW-VOX adapter sits at the station, between the Raspberry Pi and the radio. It's a USB sound card with an extra circuit that closes a key line whenever it hears tone. The browser keyer sends a precisely timed tone, and the adapter turns that tone back into key closures on the radio's KEY jack.
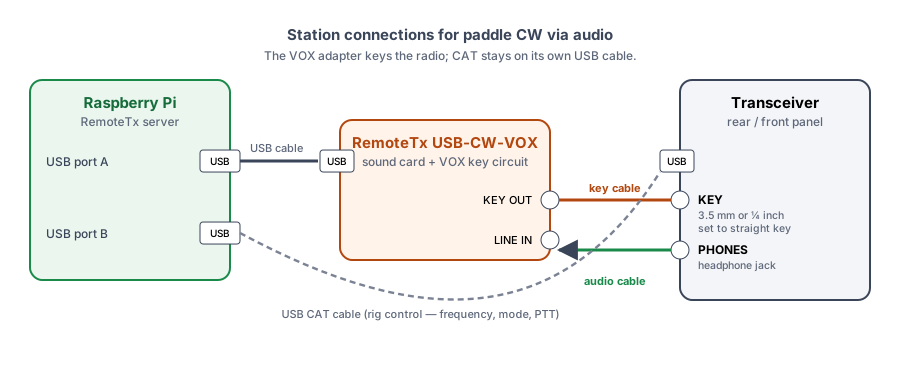
What's on the adapter#
| Connector | Direction | Connects to | Purpose |
|---|---|---|---|
| USB | — | Raspberry Pi USB port | Power, and the audio to and from the Pi |
| Key out | Adapter → radio | Radio KEY jack | Tone-operated keying circuit: keys the radio while CW tone is playing |
| Line in | Radio → adapter | Radio PHONES jack | Receive audio back to the operator |
Connecting it#
- Power down the radio.
- Plug the adapter's USB cable into a free USB port on the Raspberry Pi. Keep the radio's CAT USB cable on its own port; the CW keyer doesn't replace rig control.
- Connect the adapter's key out to the radio's KEY jack. Many radios have a 3.5 mm key jack; others, often larger base-station radios, have a ¼ inch (6.35 mm) jack. Use a cable with the matching plug, or a 3.5 mm to ¼ inch adapter.
- Connect the radio's PHONES jack to the adapter's line in.
- Power up the radio and the Pi, and connect from the client as usual.
Radio settings#
The browser already forms the characters, so the radio must treat the KEY jack as a straight key, not as a paddle input for its own keyer.
| Setting | Value | Why |
|---|---|---|
| Mode | CW (or CW-R) | The key line only transmits in CW |
| Key type / keyer type | Straight | So the radio follows the key line exactly and doesn't run its internal iambic keyer |
| Break-in | Semi (BK-IN) or Full (QSK) | Closing the key line switches the radio to transmit |
Menu names differ by manufacturer (Key Type, Keyer Type, Paddle/Straight, KEYER …). Look for the setting that selects between paddle, bug and straight.
Levels#
Before adjusting any levels, choose the USB-CW-VOX adapter in the Sound Card list (it shows as USB Audio Device), then click the green Start/Restart Audio button. This switches the Pi from the radio's built-in sound card to the adapter. Until you do, the level controls act on the radio's sound card, not the adapter.
To check you're on the right card: turn the radio's AF gain up and down. If the receive audio you hear changes with it, the adapter's sound card is selected. If it doesn't, the Pi is still using the radio's built-in sound card.
The USB-CW-VOX adapter's levels are set in the Remote Audio panel on the client's Audio tab.
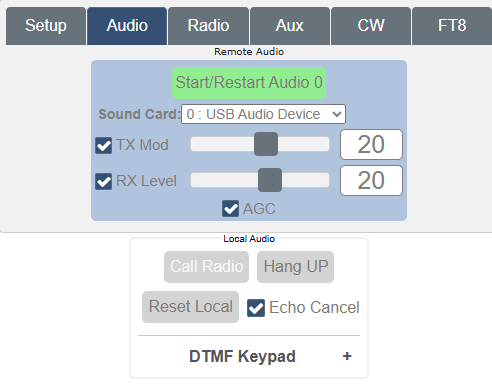
TX Mod#
TX Mod is the most important setting. It sets how strong the CW tone reaching the adapter is, and that tone is what triggers the keying circuit. Set it about 2 steps above the point where the radio first starts to key. On most stations this ends up around 20.
To find the right setting:
- Lower TX Mod to about 16–17, where the radio doesn't key yet.
- Send a series of dits.
- While sending, raise TX Mod one step at a time until the radio starts keying.
- Set TX Mod about 2 above that point.
If keying drops out in the middle of characters, TX Mod is too low. Too much level can distort characters at higher speeds.
RX Level#
Start with RX Level at about 20. What you hear is also controlled by AF gain on the RemoteTx radio panel. Fine tune these adjustment to a comfortable listening level.
Testing the station#
Test into a dummy load or at low power the first time. A wrong key setting can leave the radio in transmit.
- On the CW tab, tick Use radio key input (Mute MIC) and make sure Rise/fall to radio is unticked.
- Set the radio to CW, straight key, break-in on, low power.
- Send a few slow dits from the on-screen DIT button or the ← key.
- The radio should switch to transmit and show power output in step with your dits. Its own TX indicator should follow the KEY lamp on the CW tab.
- Send a string of
Vs at your normal speed and listen on a second receiver or an SDR if you have one. Adjust Weight if the signal sounds heavy or light.
If nothing keys, see Troubleshooting.