RemoteTx can be used to operate in the FT8 mode remotely after a few items are set up. There are 2 main things that need to be done in addition to the normal remote control setup.
- An additional virtual audio cable software component needs to be added to the Mac to route the sound between the web browser and the WSJT-X program. In the example below a free open source version named ‘Soundflower’ is used.
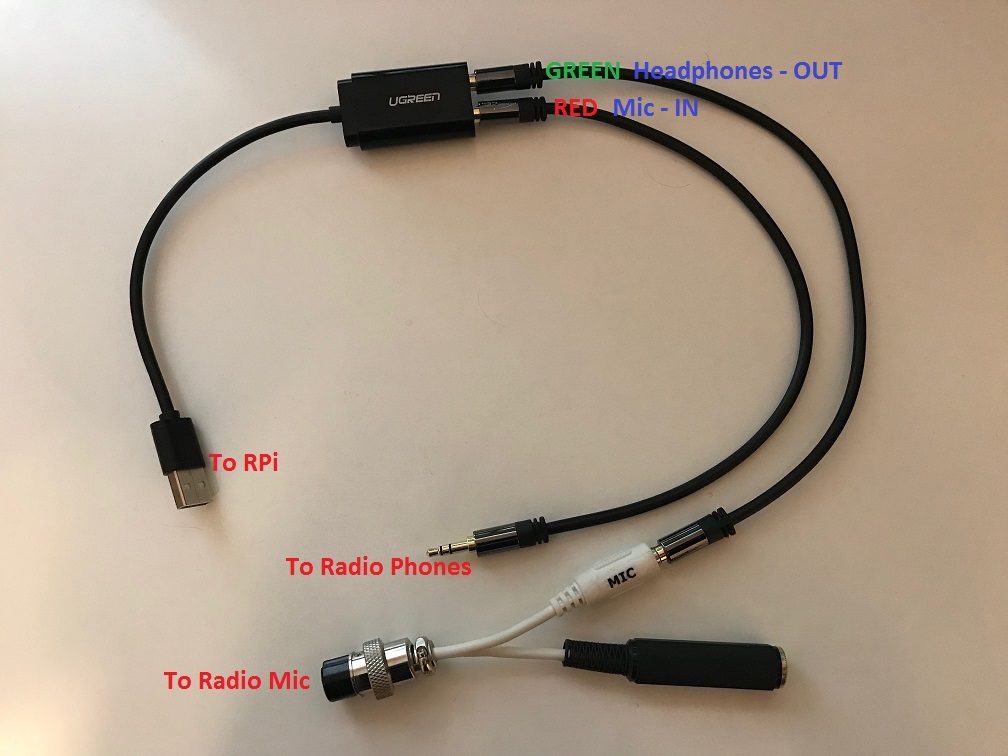
- An additional usb sound card needs to be connected from the RPi to the mic-input and phones-output of the radio. This is so VOX can be used on the radio to control the keying of the radio. It can only be done if the TX audio is entering the radio through the Mic input on the IC-7300. A Mic adapter plug will also need to be obtained or crafted so that the output of the USB audio adapter (3.5mm plug) is connected to the mic pins on the 8 pin mic connector on the front of the radio.
Preferred USB Audio device: Behringer U-Control UCA202 RCA Cables
Also Good USB Audio device: U-Green USB Audio 3.5mm Cables (need 2)
Mic adapter plug: W2ENY adaptors or Heil at HRO
Step by Step Mac setup items:
- Download and install the ‘Soundflower’ Virtual Audio Cable software:
Web Site: https://github.com/mattingalls/Soundflower/releases
Download: https://github.com/mattingalls/Soundflower/releases/download/2.0b2/Soundflower-2.0b2.dmg
Read the installation instructions and the ‘New Security Steps Required By Apple’. You may need to press the ‘control’ key when clicking the ‘Soundflower.pkg’ and then click ‘Open’.
Example: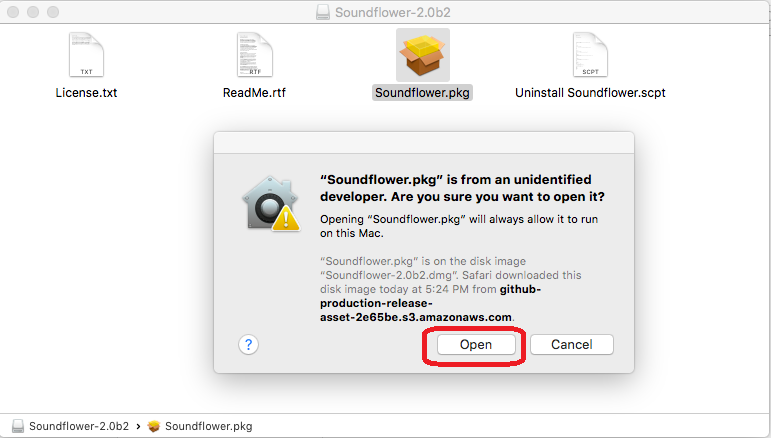
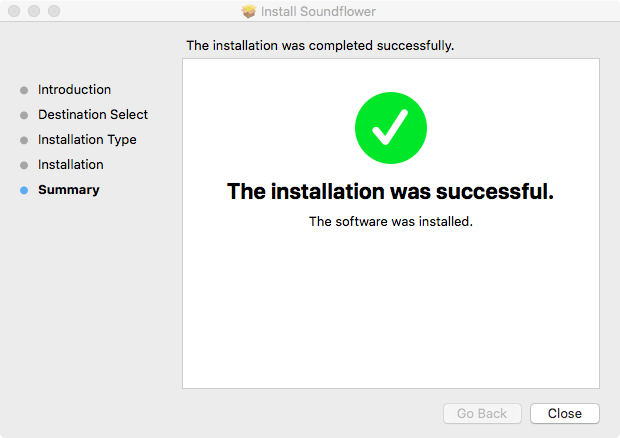
- Setup digital audio input ‘digi-in’:
-Open the Audio Midi Setup App: Launchpad->Other->Audio Midi Setup
-You should see ‘Soundflower(2ch)’ and ‘Soundflower(64ch)’.
-In bottom left corner click the ‘+’ button and choose ‘Create Multi-Output Device’ from the menu.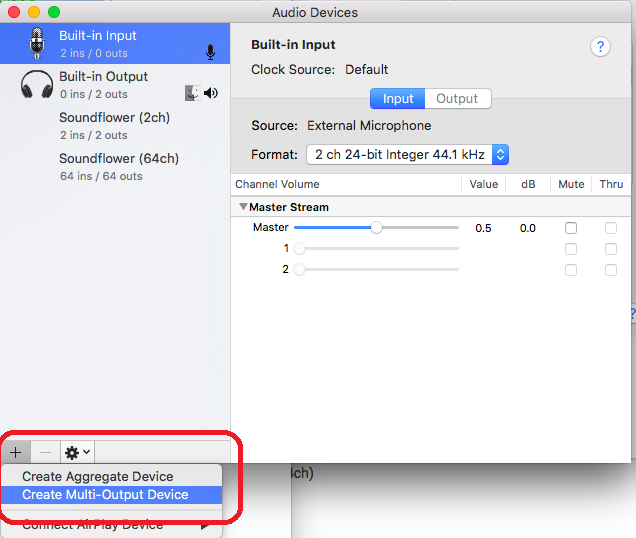
-Click on text ‘Multi-Output Device’ to edit and rename it to: digi-in.
-From the device list in the right panel, first check ‘Use’ for ‘Built-in Output’ and then ‘Use’ for ‘Soundflower(64ch)’.
(Order of selection above is important!)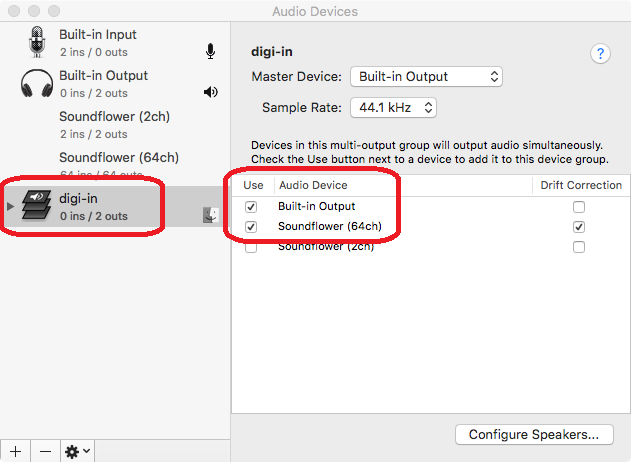
-Right-Mouse-Click (or Control Click) the ‘digi-in’ sound device and select ‘Use This Device For Sound Output’ from the menu.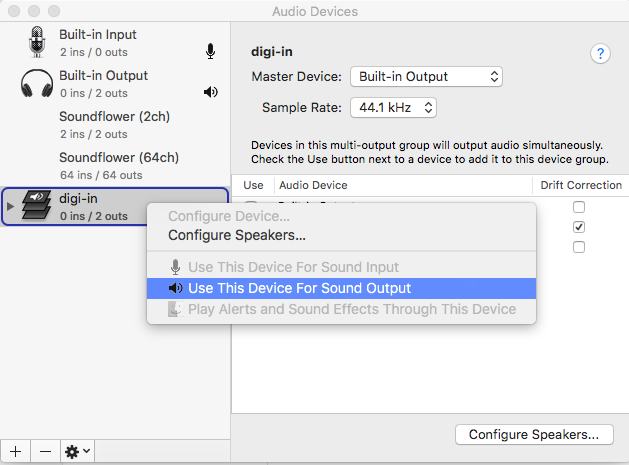
-Right-Mouse-Click (or Control Click) the ‘Soundflower(2ch)’ sound device and select ‘Use This Device For Sound Input’ from the menu.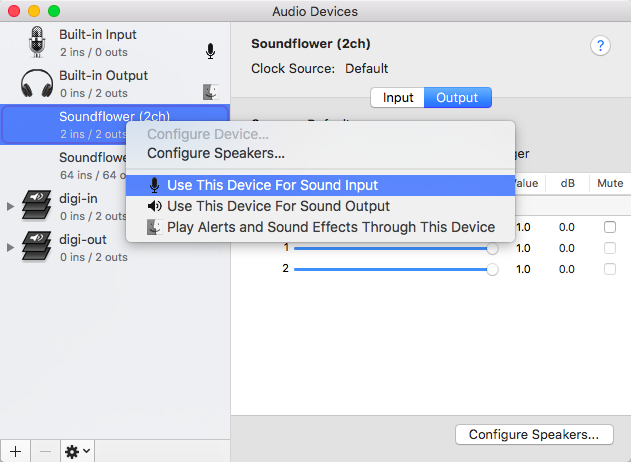
- Set systems sounds to speakers. (not ‘digi-out’ / radio)
This setting may already set and not need to be changed.
Right-Mouse-Click (or Control Click) the ‘Built-in Output’ sound device and select ‘Play Alerts and Sound Effects Through This Device’ from the menu.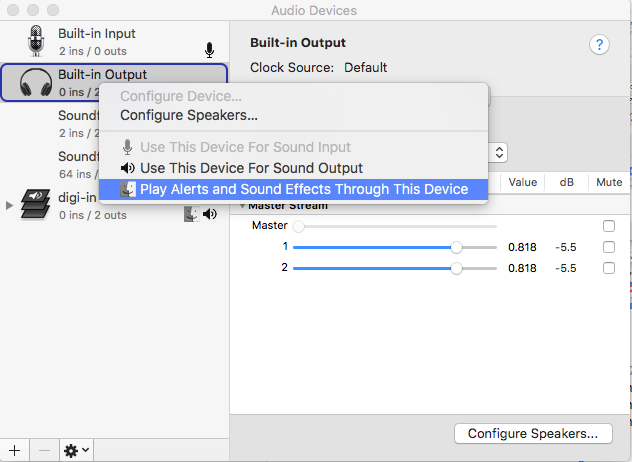
- Setup digital audio output ‘digi-out’:
Open the Audio Midi Setup App: Launchpad->Other->Audio Midi Setup
In bottom left corner click the ‘+’ button and choose ‘Create Multi-Output Device’ from the menu.
Click on text ‘Multi-Output Device’ to edit and rename it to: digi-out.
From the device list in the right panel, first check ‘Use’ for ‘Built-in Output’ and then ‘Use’ for ‘Soundflower(2ch)’.
(Order of selection above is important!)
The Audio Devices Midi Setup panel should now look like this: (Check it carefully.)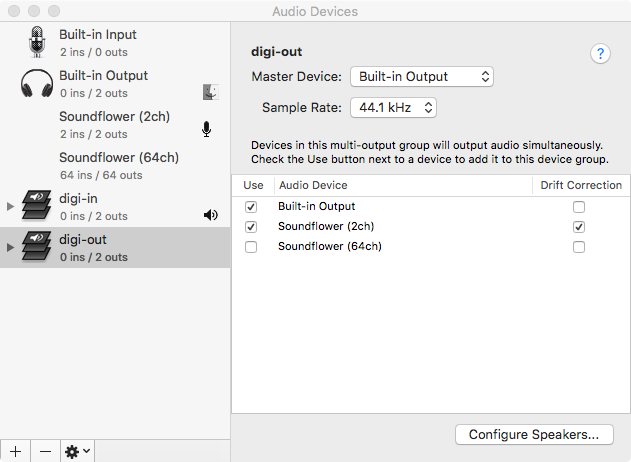
Audio Midi Setup is now complete. You can close the Audio Devices window if you like. - Setup WSJT-X:
-Open the WSJT-X program. (WSJT-X->Preferences)
-Open the Preferences Menu in WSJT-X.
-Click on the Radio Panel and choose Rig: None and PTT Method: VOX.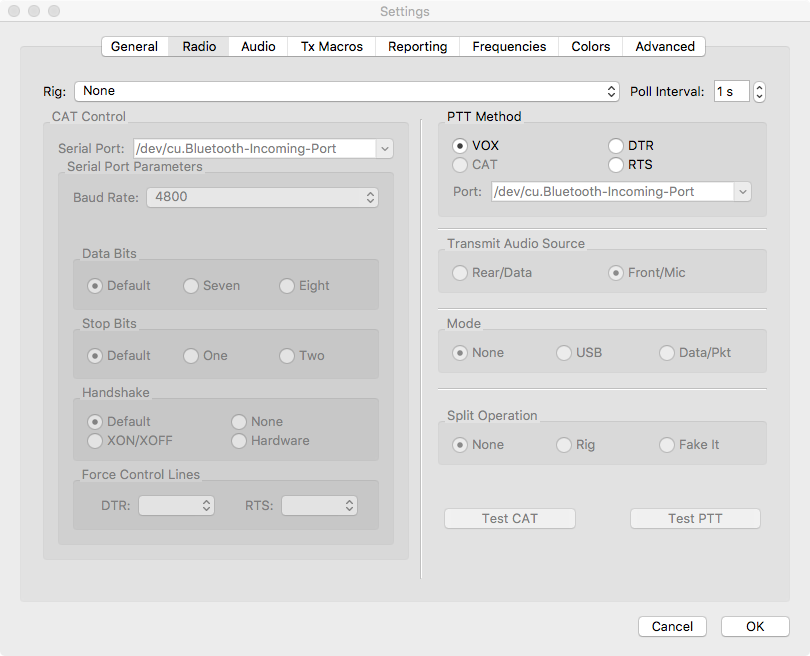
-Click on the Audio Panel and choose Input: Soundflower(64ch) and Output: digi-out.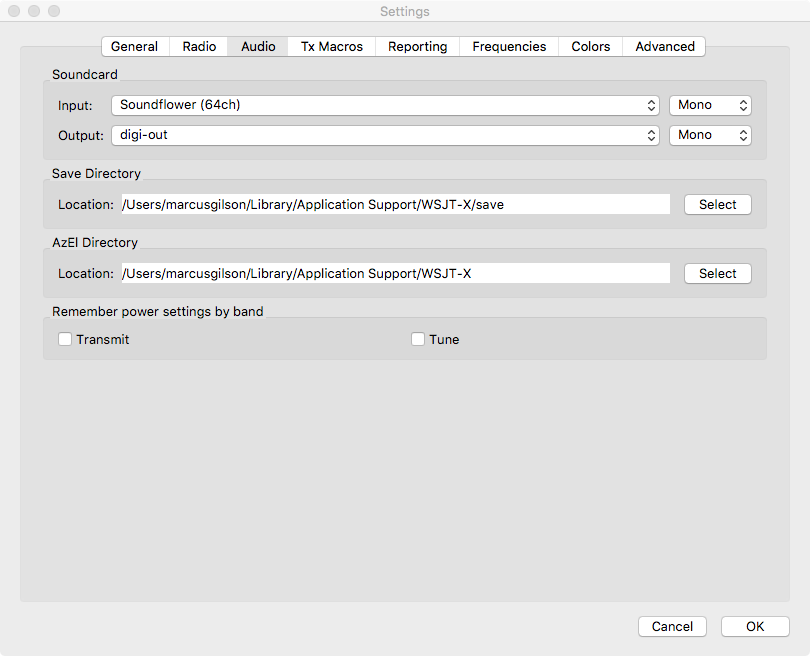
This completes the setup of the sound settings and WSJT-X.
Next is configuration of the Icom 7300 and RemoteTx.
Icom Physical 7300 Setup:
A USB sound card needs to be connected to the Icom 7300 so that it’s output (green) is connected to the mic pins (1 and 7) of the radio 8 pin mic plug. The USB sound card input (red) needs to be plugged in to the phones jack on the front of the radio. A mic adapter is required similar to the one in the photo below. (Search for ‘Heil AD-1-IC’ on the internet).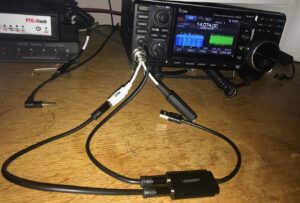
RemoteTx Icom 7300 Settings:
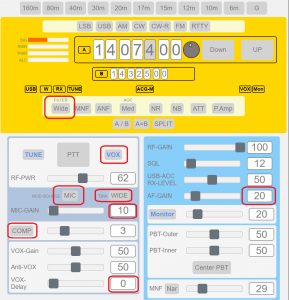
- Connect to the IC-7300 RemoteTx control interface configure the following items:
- Set receive filter to ‘Wide’.
- Turn ‘VOX’ on (button is blue).
- Set MOD-SOURCE to ‘MIC’.
- Set TBD to ‘WIDE’.
- MIC-GAIN about 10 (adjust as necessary).
- Turn COMP off (button is grey).
- Set VOX and Anti-VOX at 50.
- Set VOX-Delay at 0.
- Set AF-GAIN at about 20 (adjust as necessary according to receive level seen in WSJT-X).
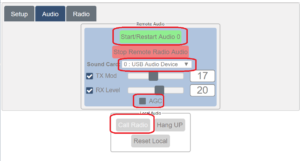
- Select and Start the secondary USB audio sound card.
- Select the secondary USB sound card. It could be either 0 or 1, just experiment.
- Click the green ‘Start/Restart’ button.
- Make sure AGC is not checked if it is present.
- Click ‘Call Radio’ to start sound.
- Start WSJT-X, set the mode to FT8 and manually set the band to match the radio.
You should see signals decoding and when you transmit the radio should transmit via VOX.
You should hear received signals and your transmitted signal through the Mac speakers/earphones.
The RemoteTx control interface will show if the radio is in transmit or receive and will show PWR, SWR and ALC.
Make audio adjustments with the TX Mod setting above and the output level (PWR slider on right) of WSJT-X so that ALC is just beginning to register.
Make sure ALC is not high. It is best to initially get everything adjusted while you are in front of the radio.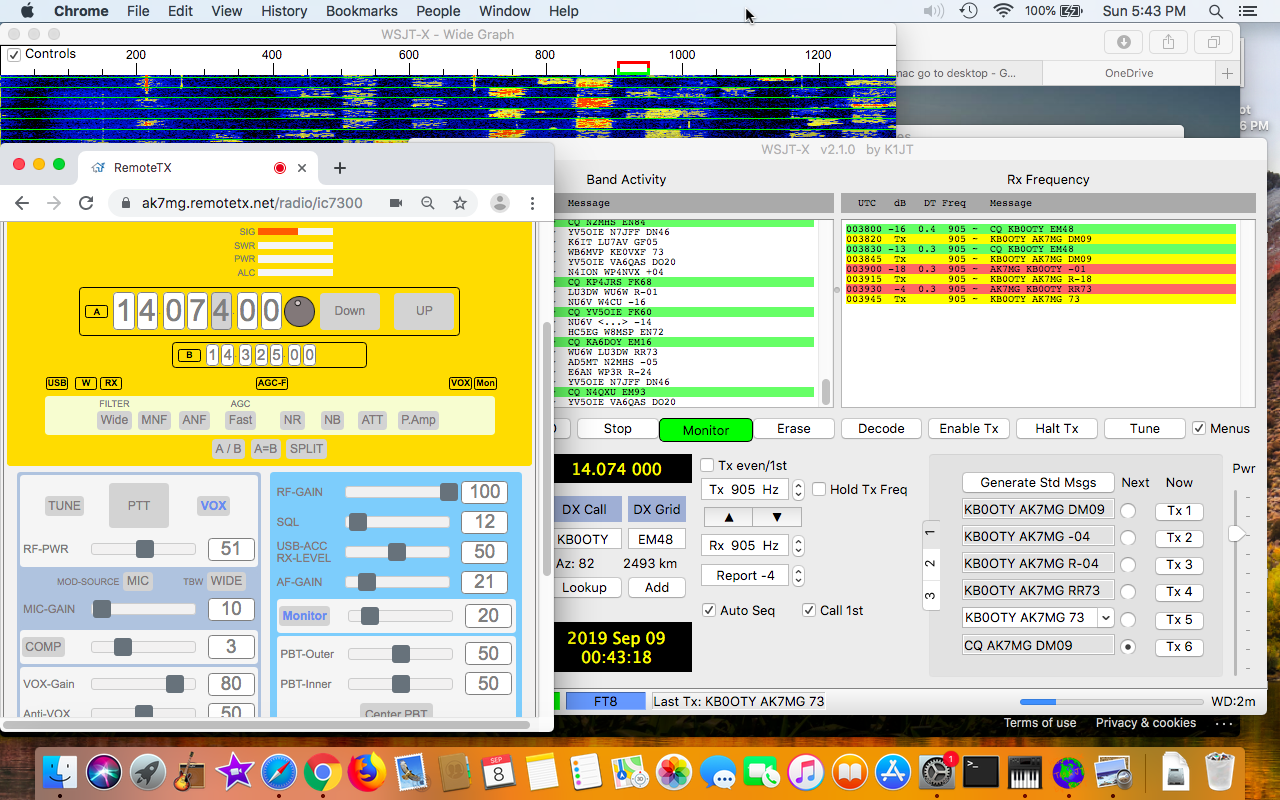
Hints:
- Turn off ‘VOX’ when you are done so that it doesn’t start triggering if you later connect to the radio with your phone.
- Make sure the clock on your PC is recently synced to network time.
- Reduce the size of the RemoteTx window by changing the zoom factor of the browser.
- Set WSJT-X so that it automatically prompts you to log completed QSOs.